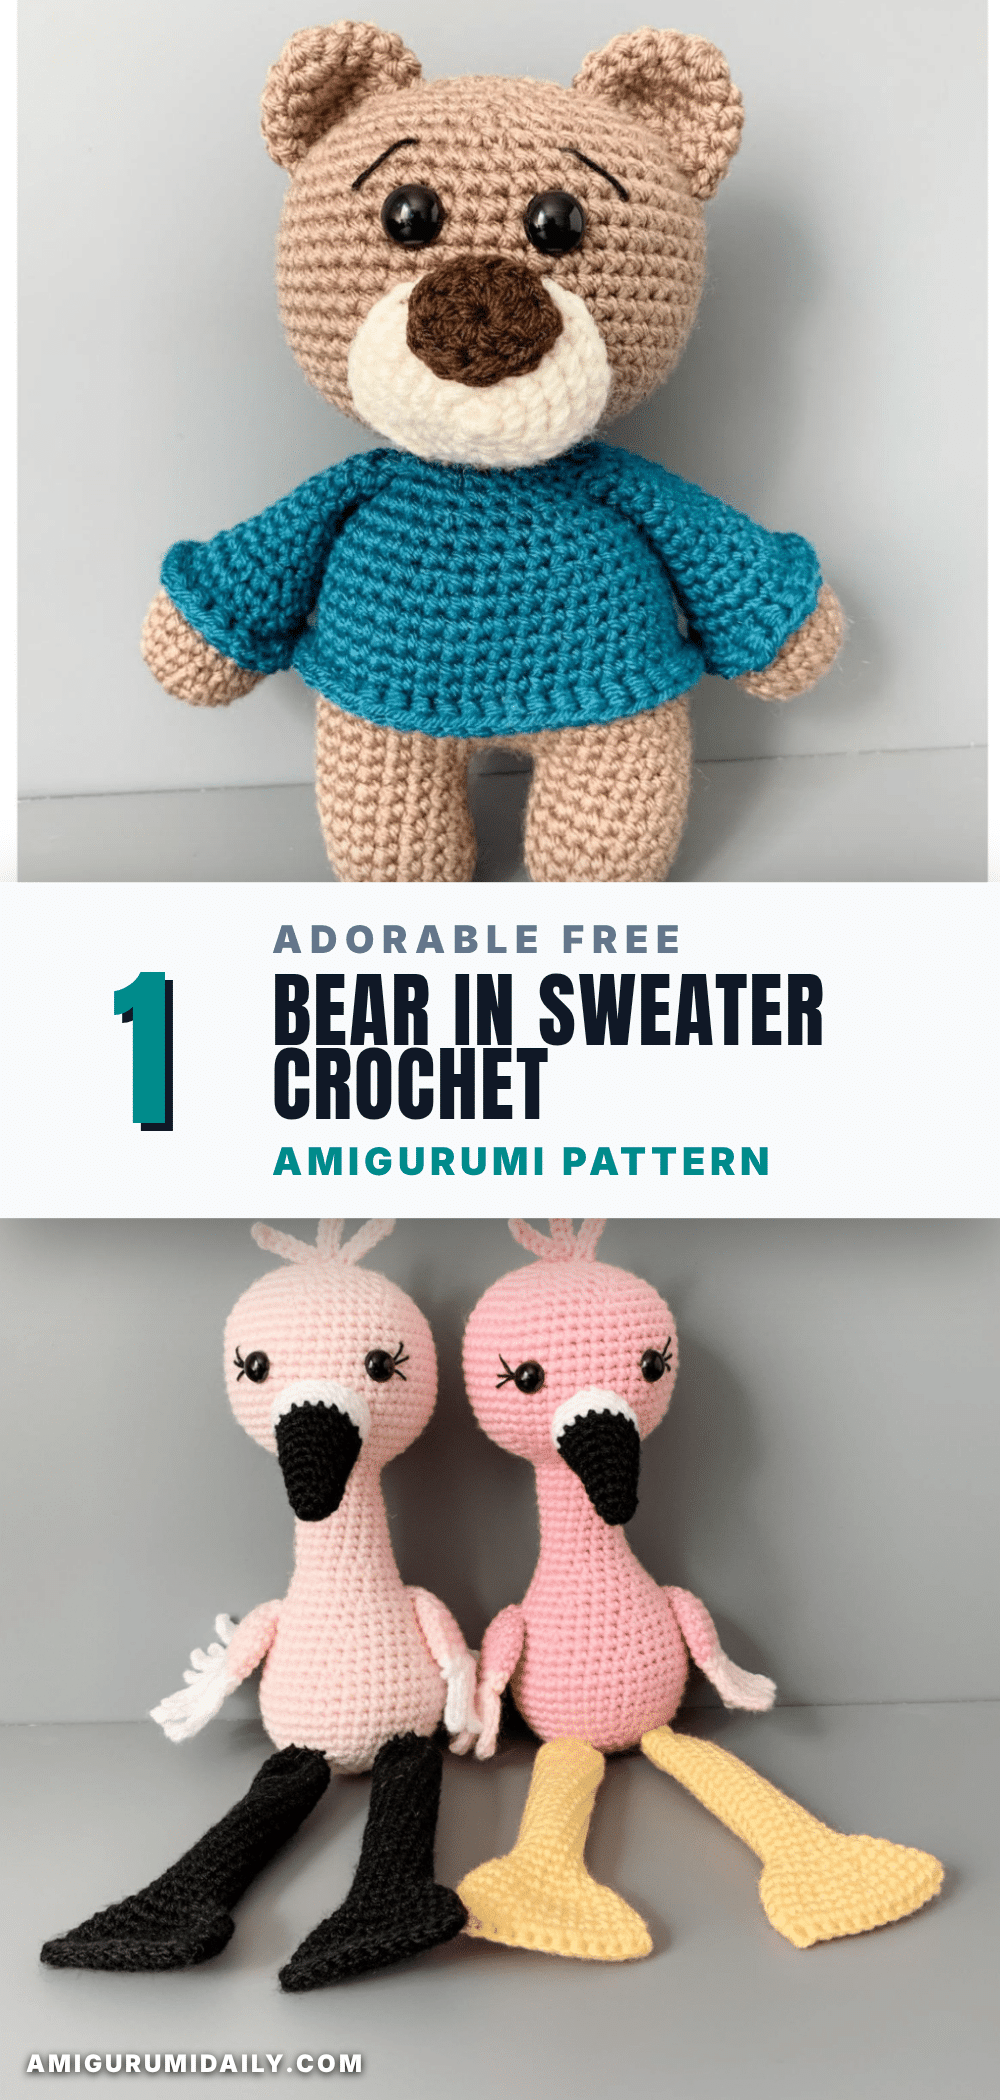
Did you ever start a crochet project thinking it would be a quick, mindless task, only to realize halfway through that you’re trying to juggle too many colors or get lost in the assembly? It’s a common worry for beginners, especially with amigurumi, where the temptation to rush the stuffing or skip the finishing touches can lead to a lopsided result. But this adorable bear in a sweater pattern is designed to be forgiving and straightforward. With its simple construction and clear instructions, you can focus on the joy of creating rather than the stress of perfection. It’s the perfect project to build your confidence while making a cuddly companion that’s ready for hugs.
Maker Notes
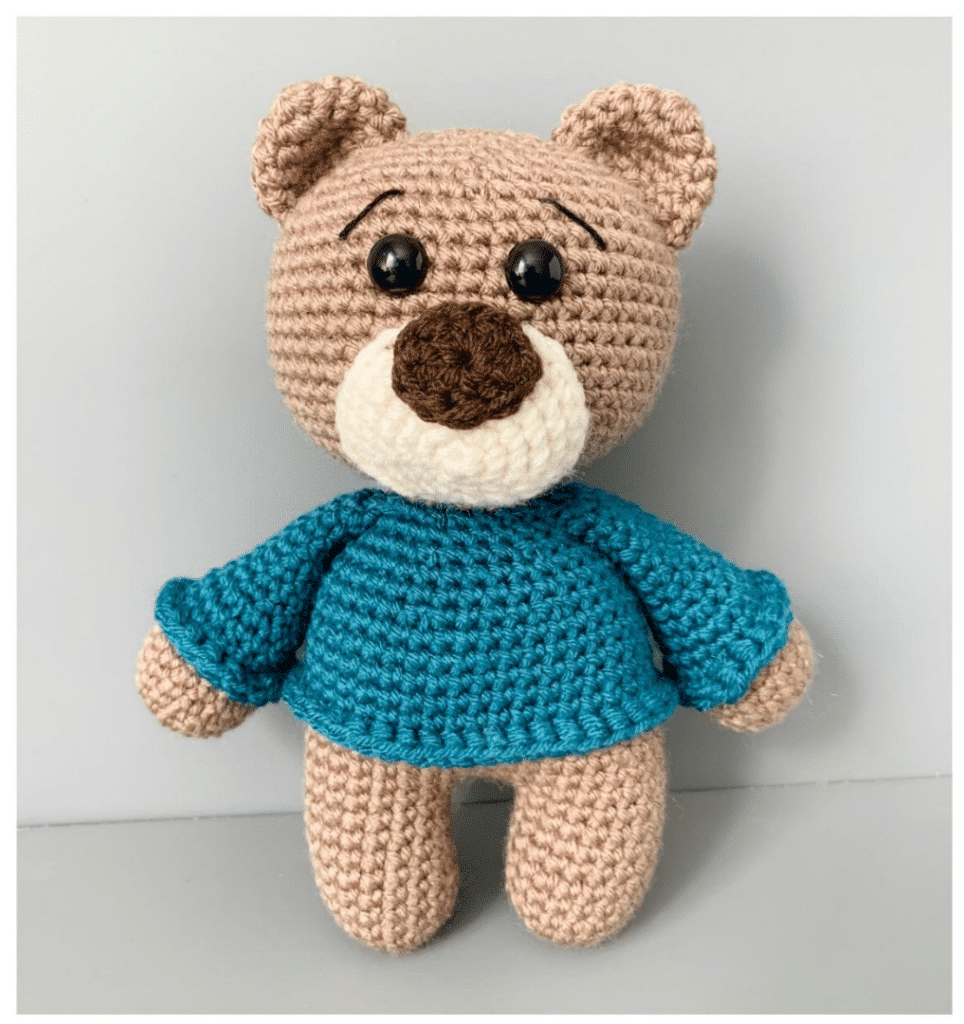
There is something undeniably charming about a bear wearing a little sweater. It transforms a standard amigurumi project into a character with personality. This pattern allows for endless creativity in color choices. While the bear’s body is classic brown or tan, the sweater color is entirely up to you. You might choose a festive red for the holidays, a soft pastel for spring, or a bold plaid effect using variegated yarn. The texture of the worsted weight yarn gives the bear a sturdy yet soft feel, making it ideal for both display and play. The addition of embroidered eyebrows adds a touch of expression that brings the face to life, distinguishing it from a generic stuffed animal.
Project Overview
This beginner-friendly amigurumi pattern creates a small bear, approximately 8 inches tall. The construction is unique in that the legs are made separately and then joined to form the body, which seamlessly transitions into the head. The bear features a cozy sweater with detailed sleeve and hem edges, a distinct snout, and expressive eyebrows. It is designed to be simple to assemble, allowing you to spend more time crocheting and less time sewing.
Materials
- About 100g size 4 worsted weight yarn in brown or tan color
- Small amount in desired sweater color
- Small amount for snout color (e.g., ivory) and nose (e.g., dark brown)
- 12mm safety eyes
- Stuffing
- 3.75mm hook
- Small amount of floss for eyebrows
- Polyfil
- Needle for sewing
- Stitch marker
Gauge and Finished Size
The finished Friendly Bear is approximately 8 inches tall. Because amigurumi is worked in continuous rounds and stuffed, specific gauge measurements are not provided, but using the recommended 3.75mm hook and size 4 worsted weight yarn will help achieve the correct density and size.
Abbreviations
- SC – Single Crochet
- SC INC – Single Crochet Increase (2 SC in each stitch)
- INV DEC – Invisible decrease (put hook through the FRONT LOOP ONLY of two consecutive stitches [two loops on hook] Yarn over pull through both loops. [two loops on hook] Yarn over pull through two loops)
- Magic Circle – Make a loop, leaving a long tail to work with. Insert hook in center of loop, yarn over and draw up a loop. Yarn over, pull through to make the first chain (this does not count as a stitch!). Continue to crochet over the loop and tail with the number of stitches called for. (If you need 6 SC, then crochet 6 SC inside the ring.) Pull the tail to close the circle.
Pattern Notes
- Always move your stitch marker to the last stitch in the round.
- This pattern is worked in continuous rounds.
- You can use safety eyes or try out embroidered eyes so it would be safe for a baby/toddler.
Pattern Instructions
Snout
In ivory:
- Round 1: SC 5 in magic circle.
- Round 2: SC INC in each stitch around. (10)
- Round 3: SC in the first, SC INC in the next. Repeat around. (15)
- Round 4: SC in the first 2, SC INC in the next. Repeat around. (20)
- Round 5: SC in the first 3, SC INC in the next. Repeat around. (25)
- Round 6-7: SC in each around. (25) *2 rounds*
Slip stitch in the next two stitches in order to flatten the edge. When attached it lays flat against the head and is not stuffed.
Nose
In brown:
- DC 10 in a magic circle. Pull tight and slip stitch to the first stitch. Pull the edges of the circle so it becomes more oval and attach to the top of the snout. You will see 5 “edges” on the snout.
- Sew the nose in the middle of one of those edges. Then when you attach you will have a slight point at the bottom.
Legs and Body
Round 1: In a magic circle, SC 6
Round 2: SC INC in each stitch around (12)
Round 3: SC in first, SC INC in next. Repeat around. (18)
Round 4-10: SC in each stitch around. (18) *7 rounds*
Fasten off. Repeat for the second leg but do not fasten off.
Instead, chain 3 and then SC in the next stitch of the other leg. Take care to crochet over the tail left over by fastening off. SC around the entire leg (18). When you come to the three chains, SC in each chain to the next leg (3). Crochet in each stitch around the other leg (18). SC on the chain back to the other leg (3). In the last SC on the last chain place your stitch marker (42 stitches total). (This is round 11.)
If you need help I have a video showing a similar pattern on my blog: https://www.thefriendlyredfox.com/how-to-attach-crocheted-dolls-legs/
Rounds 12-14: SC in each around. (42) *3 rounds*
Change to sweater color.
Rounds 15-20: SC in each around. (42) *6 rounds*
Round 21: SC in the first 4, INV DEC in the next. Repeat around. (35)
Rounds 22-23: SC in each around (35) *2 rounds*
Round 24: SC in the first 3, INV DEC in the next. Repeat around. (28)
Round 25: SC in each around. (28)
Round 26: SC in the first 2, INV DEC in the next. Repeat around. (21)
Change to brown.
Round 27: SC in the first , INV DEC in the next. (14) INV DEC until you have 12 stitches on the round.
Round 28: SC in first, SC INC in next. Repeat around. (18)
Round 29: SC in first 2, SC INC in next. Repeat around. (24)
Round 30: SC in first 3, SC INC in next. Repeat around. (30)
Round 31: SC in first 4, SC INC in next. Repeat around. (36)
Round 32: SC in first 5, SC INC in next. Repeat around. (42)
Round 33: SC in first 6, SC INC in next. Repeat around. (48)
Round 34: SC in first 7, SC INC in next. Repeat around. (54)
Round 35-47: SC in each stitch around. (54) *13 rounds*
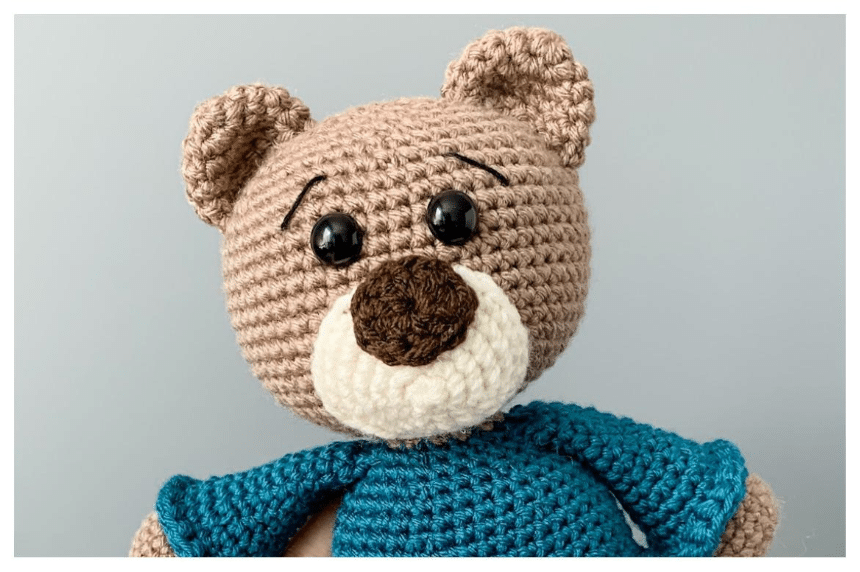
Place the safety eyes in between rows 41 and 42, four stitches apart. Sew on eyelashes or eyebrows here. Sew the snout on. The bottom should be on about row 29. The top should be about one row below the eyes.
Round 48: SC in the first 7, INV DEC in the next. Repeat around. (48)
Round 49: SC in the first 6, INV DEC in the next. Repeat around. (42)
Round 50: SC in the first 5, INV DEC in the next. Repeat around. (36)
Round 51: SC in the first 4, INV DEC in the next. Repeat around. (30)
Round 52: SC in the first 3, INV DEC in the next. Repeat around. (24)
Round 53: SC in the first 2, INV DEC in the next. Repeat around. (18)
Round 54 : SC in the first, INV DEC in the next. Repeat around. (12)
Round 55: INV DEC around. (6) Fasten off and leave a tail.
Ears (make 2)
Round 1: 6 SC in a magic ring
Round 2: SC INC in each around. (12)
Round 3: SC in first, SC INC in next. Repeat around. (18)
Rounds 4-6: SC in each around. (18) Leave a long tail to sew on. *3 rounds*
Attach the ears about 3 rows out from the middle on the top.
Arms (make 2)
Round 1: 6 SC in a magic ring
Round 2: SC INC in each around. (12)
Round 3: SC in first, SC INC in next. Repeat around. (18)
Rounds 4-6: SC in each around. (18) *3 rounds*
Change to shirt color.
Rounds 7-9: SC in each around. (18) *3 rounds*
Round 10: SC in the first, INV DEC in the next. Repeat around. (12)
Rounds 11-18: SC in each around. (12) *7 rounds*
Fasten off and leave a long tail to sew on.
Add the edge of the sweater sleeve by attaching yarn around the post on the first row of color. Chain 2 and HDC in each post around the bottom of the sleeve. Attach with a slip stitch to the first stitch. Fasten off and weave in the ends. Attach the arm around round 26.
Add the same edge in the same way to the bottom of the sweater. (Round 15)
Assembly
- The legs are made separately and then attached to form the body.
- The body will decrease and then increase into the head.
- Attach the snout, arms, and ears.
- Add the edge of the sweater sleeve by attaching yarn around the post on the first row of color. Chain 2 and HDC in each post around the bottom of the sleeve. Attach with a slip stitch to the first stitch. Fasten off and weave in the ends. Attach the arm around round 26.
- Add the same edge in the same way to the bottom of the sweater. (Round 15)
- Place the safety eyes in between rows 41 and 42, four stitches apart. Sew on eyelashes or eyebrows here.
- Sew the snout on. The bottom should be on about row 29. The top should be about one row below the eyes.
- Attach the ears about 3 rows out from the middle on the top.
Tips
- Always move your stitch marker to the last stitch in the round.
- This pattern is worked in continuous rounds.
- You can use safety eyes or try out embroidered eyes so it would be safe for a baby/toddler.
FAQs
Can I make this bear safe for a baby?
Yes. Instead of using 12mm safety eyes, you can embroider the eyes using the floss provided in the materials list. This eliminates any small parts that could be a choking hazard.
What size hook should I use?
The pattern recommends a 3.75mm hook to work with size 4 worsted weight yarn. Using a hook that is too large may result in loose stitches that allow stuffing to show through.
How do I join the legs to the body?
After crocheting the first leg, do not fasten off. Chain 3, then SC into the next stitch of the second leg. Continue crocheting around both legs, ensuring you SC into the chain-3 space to connect them smoothly. This creates a seamless join at the bottom of the body.
How do I attach the sweater details?
For the sleeve and hem edges, attach your yarn to the post of the first stitch of the sweater color section. Chain 2 and work HDC in each post around the bottom of the sleeve or hem. This creates a neat, finished edge that looks like a real sweater cuff.
Where should I place the eyebrows?
Sew the eyebrows on after the safety eyes are attached. They should be positioned just above the eyes to give the bear its characteristic expression.
Pin This Crochet Pattern!