There is a specific kind of magic that happens when you sit down with a hook and yarn, letting the project begin to take shape under your fingers. For this Zodiac Cow, that moment starts with a simple magic ring and grows into a tiny, expressive character. The yarn flows, the rounds stack, and suddenly you have a little amigurumi friend with a distinct personality. It is a grounded, satisfying process that rewards patience with a sweet, handmade result.
Why This Project Works
This Zodiac Cow is more than just a farm animal; it is a character study in charm. The design relies on a few key elements that make it irresistible: the contrast of the mixed black-and-white ears, the soft pink-beige muzzle, and the cheerful yellow overalls. These details transform a standard cow shape into a zodiac-inspired companion with a “baby-style” aesthetic. The yellow overall bib is worked directly into the body, creating a cute, dressed-up look without the hassle of sewing on a separate outfit. It is the perfect size for a desk decoration, a nursery toy, or a small collectible piece that fits easily in the palm of your hand.
Project Overview
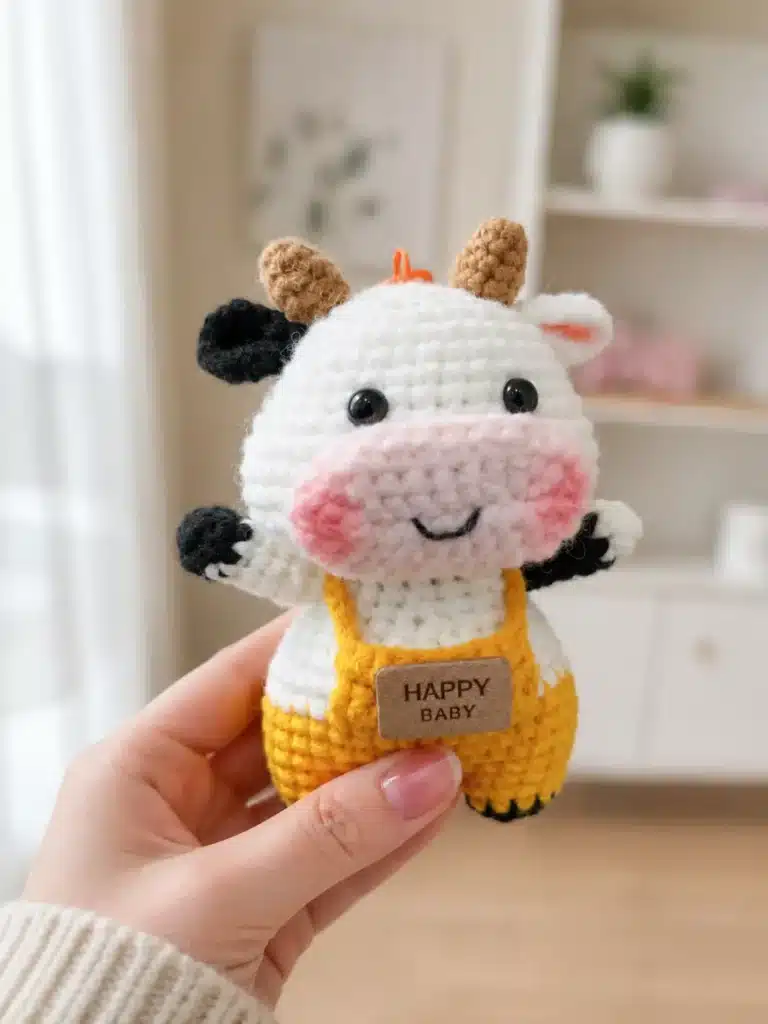
The Zodiac Cow Crochet Pattern is a small amigurumi project made from separate parts: head, body with legs, arms, ears, horns, and muzzle. The yellow overall bib is worked directly into the front loops left on the body, which gives the cow a cute dressed-up look without needing to crochet a separate outfit. This is a lovely project for:
- Zodiac animal collections
- Baby cow amigurumi gifts
- Bag charms or keychains
- Desk decorations
- Handmade nursery-style toys
- Small crochet animal collections
Materials
- 2.0 mm crochet hook
- White yarn for the head and body
- Black yarn for the arms, hooves, and one ear
- Yellow yarn for the legs and overalls
- Light pink beige or skin-color yarn for the muzzle
- Beige or light brown yarn for the horns
- Black safety eyes
- Black embroidery thread for the smile
- Pink blush or pink yarn for cheek details
- Fiberfill stuffing
- Yarn needle
- Stitch marker
- Scissors
- Pins for assembly
For a soft baby-style look, use cotton, milk cotton, or fine chenille yarn. If you love small plush-style animals, you may also enjoy the cozy look of the Mini Butter Bear Crochet Pattern.
Abbreviations
- MR = magic ring
- ch = chain
- sc = single crochet
- inc = increase, 2 sc in the same stitch
- dec = single crochet decrease
- hdc = half double crochet
- sl st = slip stitch
- BLO = back loop only
- FO = fasten off
Note: Work in continuous rounds unless the pattern says otherwise. Use a stitch marker to mark the beginning of each round.
Pattern Notes
This Zodiac Cow Crochet Pattern uses several small parts, so take your time with the assembly. The face placement is especially important because the cute baby-style expression comes from the muzzle, eyes, blush, horns, and ears sitting evenly together.
Do not overstuff the arms. They should stay slightly flat so they can be attached directly while crocheting the body. For neat limb placement, my guide on attaching amigurumi limbs evenly can help you keep both arms balanced.
When changing from yellow to white on the body, leave the yellow yarn outside as instructed. This yarn will be used later to create the overall bib.
Pattern Instructions
Head
Color: White
Rnd 1: 8 sc in MR. [8]
Rnd 2: inc ×8. [16]
Rnd 3: (sc, inc) ×8. [24]
Rnd 4: (2 sc, inc) ×8. [32]
Rnd 5: (4 sc, inc) ×2, 5 sc, inc, (4 sc, inc) ×2, 5 sc, inc. [38]
Rnd 6–9: sc around. [38]
Rnd 10: 10 sc, inc ×6, 6 sc, inc ×6, 10 sc. [50]
Rnd 11–14: sc around. [50]
Rnd 15: 10 sc, dec ×6, 6 sc, dec ×6, 10 sc. [38]
Rnd 16: 2 sc, dec, (3 sc, dec) ×6, 2 sc, dec, 2 sc. [30]
Rnd 17: (3 sc, dec) ×6. [24]
Rnd 18: (sc, dec, sc) ×6. [18]
FO. Do not leave a long tail.
Set the head aside. You will sew it to the body during assembly.
Legs and Body
Colors: Black, Yellow, White
Legs ×2
Start with black yarn.
Rnd 1: 6 sc in MR. [6]
Rnd 2–3: sc around. [6]
Rnd 4: Change to yellow, sc around. [6]
Make 2 legs.
For the first leg, FO. For the second leg, do not cut the yarn.
Ch 3 and join to the first leg.
Body
Continue with the yarn from the second leg.
Rnd 5: 12 sc around the first leg, 3 sc along the chain, 12 sc around the second leg, 3 sc along the other side of the chain. [30]
Rnd 6: (2 sc, inc, 2 sc) ×6. [36]
Rnd 7–9: sc around. [36]
Rnd 10: Change to white and crochet 12 sc. Do not cut the yellow yarn. Bring the yellow yarn to the outside of the body. Continue with 24 sc in BLO. [36]
Rnd 11: 6 sc, dec, 16 sc, dec, 10 sc. [34]
Rnd 12: 4 sc, dec ×2, 14 sc, dec ×2, 8 sc. [30]
Rnd 13: (2 sc, dec, 2 sc) ×5. [25]
Rnd 14: 10 sc, dec, 13 sc. [24]
Rnd 15: Attach the arms directly while crocheting: 2 sc, dec while attaching the left arm at the back side, 2 sc through the left arm, dec, 2 sc, dec, 2 sc, dec while attaching the right arm at the back side, 2 sc through the right arm, dec, 2 sc.
Rnd 16: 18 sc. [18]
Stuff the body firmly. FO and hide the yarn tail.
This small body shape gives the cow a cute rounded baby look. If you like dressed amigurumi animals, you may also enjoy the soft character style in the Three Bare Bears Crochet Pattern.
Overall Bib / Strap Pants
Use the yellow yarn that was left outside on the belly area.
Work into the outer loops left from Rnd 10.
Row 1: 9 sc.
Row 2–4: ch 1, turn, 9 sc.
FO and weave in the end.
Shape the bib neatly on the front of the body. You can gently pull it flat before sewing or adjusting the head placement.
Arms ×2
Colors: White and Black
Start with white yarn.
Rnd 1: 6 sc in MR. [6]
Rnd 2: (2 sc, inc) ×2. [8]
Rnd 3–7: Change to black, sc around. [8]
Do not stuff too much. Flatten the arm for attaching.
The black arms create a nice contrast with the white body and help the Zodiac Cow look more playful and cartoon-like.
Ears ×2
Make one black ear and one white ear.
Rnd 1: 7 sc in MR. [7]
Rnd 2: inc ×7. [14]
FO and leave a tail for sewing.
Flatten the ears slightly before attaching them to the head.
Horns ×2
Color: Light brown / beige
Rnd 1: 4 sc in MR. [4]
Rnd 2: (sc, inc) ×2. [6]
Rnd 3: (2 sc, inc) ×2. [8]
Rnd 4: sc around. [8]
FO and leave a tail for sewing.
Stuff very lightly only if needed. The horns should stay small and rounded.
Muzzle
Color: Skin color / light pink beige
Ch 9.
Rnd 1: Starting in the 2nd ch from the hook: 7 sc, 3 sc in the last ch, continue on the other side of the chain, 6 sc, inc.
Rnd 2: inc, 6 sc, inc ×3, 6 sc, inc ×2.
Rnd 3: sc, inc, 6 hdc, (sc, inc) ×3, 6 sc, (sc, inc) ×2.
FO and leave a long tail for sewing.
The muzzle is one of the most important parts of this Zodiac Cow Crochet Pattern because it gives the face that soft baby expression. Pin it in place before sewing so you can check the eye position and smile placement.
Assembly
- Sew the Muzzle: Place the muzzle on the lower front of the head. Pin it first, making sure it sits centered and slightly low on the face. Sew around the muzzle neatly using the long yarn tail. Add a small amount of stuffing under the muzzle if you want it to look slightly raised.
- Attach the Eyes: Attach the black safety eyes above the muzzle. Place them evenly on both sides. The cow should have a sweet, gentle expression. Do not place the eyes too high, or the face may lose its baby-style look.
- Embroider the Smile: Use black embroidery thread to sew a small smile on the muzzle. Keep it simple and soft. Add pink blush on both cheeks using blush powder, felt, or a tiny touch of pink yarn.
- Sew the Horns: Sew the two beige horns on top of the head. Keep them symmetrical and slightly apart.
- Sew the Ears: Sew one black ear and one white ear beside the horns. The two-color ear detail is what gives this Zodiac Cow its cute mixed-cow personality.
- Attach the Head to the Body: Place the head on top of the body and pin it in position. Make sure the muzzle faces forward and the yellow overall bib sits centered underneath. Sew the head firmly to the body. Go around the neck several times so the head stays secure.
- Final Overall Shaping: Shape the yellow overall bib neatly on the front. Adjust the front rows with your fingers so they lie flat. You can also add tiny yellow strap details with embroidery if you want a more finished overall look.
Tips
- Use a smaller hook than your yarn label recommends. This helps keep the stitches tight so the stuffing does not show.
- Stuff the head firmly, but do not overstuff the muzzle. The muzzle should stay soft and rounded, not stretched.
- When sewing the ears and horns, pin everything first. Small changes in placement can completely change the cow’s expression.
- If your decreases leave small gaps, use invisible decreases for a cleaner amigurumi finish. My guide on invisible decrease crochet is helpful if you want a smoother shape.
- For the yellow-to-white body transition, keep the yarn tension even. If you want more help with clean stripes and color swaps, you can also read my tutorial on changing colors in amigurumi.
FAQ About the Zodiac Cow Crochet Pattern
Is this Zodiac Cow Crochet Pattern beginner-friendly?
Yes, but it is best for advanced beginners. The stitches are simple, but the pattern includes small parts, color changes, BLO work, and sewing.
Can I make this cow with plush yarn?
Yes, you can use plush yarn, but the cow will become larger. Use a bigger hook that matches your yarn and choose larger safety eyes.
Can I turn this cow into a keychain?
Yes. Use cotton yarn and a small hook for a firmer result. Add a keychain ring at the top of the head after the cow is fully assembled.
Can I change the overall color?
Yes. Yellow gives the cow a bright zodiac-baby style, but blue, pink, mint, or lavender would also look adorable.
Do I need safety eyes?
No. You can embroider the eyes if the cow is intended for a small child. Embroidered eyes are safer for baby toys.
Pin This Crochet Pattern!