There is something deeply satisfying about the quiet rhythm of a small crochet project. It is the perfect companion for a cozy evening ritual: a soft lamp, a small batch of yarn, and the gentle click of the hook. As you count stitches and work through a relaxing repeat, the tension of the day melts away. This Mini Taiyaki Fish Charm is designed for that exact moment. It is a tiny, sweet project that requires minimal yarn but delivers maximum personality. Whether you are a beginner looking to build confidence or an experienced maker wanting a quick gift, this pattern offers a delightful way to spend a few hours creating something adorable.
Small Details That Make It Better
What truly elevates this charm is the balance between the classic taiyaki shape and the playful amigurumi form. The pattern calls for a narrow body section that transitions into a textured tail edge, creating a silhouette that is instantly recognizable yet undeniably cute. I love the suggestion of using beige, caramel, and light brown for a traditional look, but the charm shines just as brightly in pastel pinks, soft oranges, or creamy whites for a kawaii aesthetic. The small embroidered stripes are the finishing touch that brings the fish to life. By keeping the stuffing light and the stitches tight, the fish maintains a slightly flat, charm-ready shape that sits perfectly on a bag or keyring without looking bulky.
Project Overview
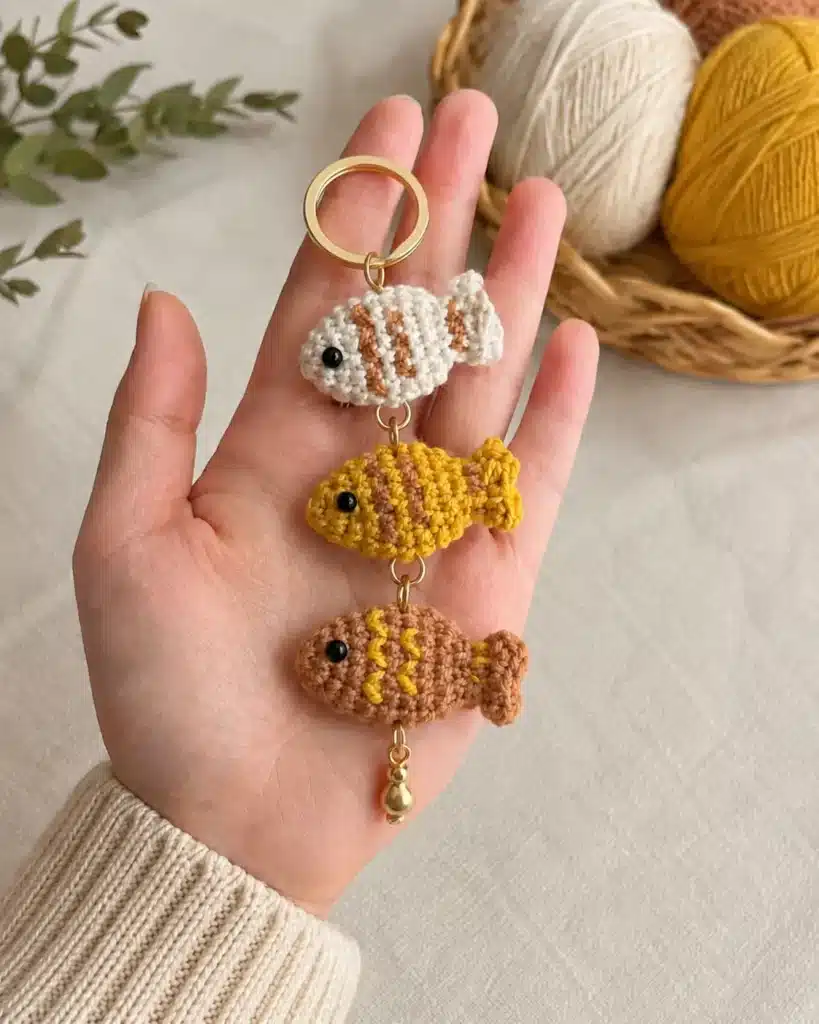
This Mini Taiyaki Fish Crochet Charm Pattern is a quick, cute, and satisfying mini crochet project. It uses simple stitches, light shaping, and easy embroidery to create a tiny fish charm with lots of personality. The shape stays small and slightly flat, which makes it perfect for a keychain charm. You can use classic taiyaki-inspired colors like beige, light brown, cream, or golden yellow. You can also make playful versions in white, yellow, pastel pink, orange, or soft blue.
Materials
- 4-ply cotton yarn or similar yarn
- Crochet hook suitable for your yarn, usually 2.0 mm–2.5 mm
- Small black safety eyes or black beads
- Brown embroidery thread for the fish stripes
- Fiberfill stuffing
- Yarn needle
- Stitch marker
- Scissors
- Keychain ring or jump rings if you want to make the hanging charm
Gauge and Finished Size
The final size depends on your yarn, hook size, and tension. With 4-ply cotton yarn and a 2.0 mm–2.5 mm crochet hook, each fish will be a small mini charm size.
Abbreviations
This pattern uses US crochet terms.
- MR = magic ring
- sc = single crochet
- inc = 2 sc in the same stitch
- dec = single crochet decrease
- hdc = half double crochet
- sl st = slip stitch
- sk = skip stitch
- FO = fasten off
If you are new to reading crochet instructions, you may find a guide on how to read an amigurumi pattern helpful before starting.
Pattern Notes
- Work in continuous rounds unless stated otherwise. Use a stitch marker to mark the beginning of each round.
- Stuff the fish lightly. Do not overstuff, because the fish should stay small and slightly flat.
- If using safety eyes, insert them before closing the body completely. If using beads, sew them on after finishing the fish.
- Embroider the stripes on both sides of the fish for the cutest result.
- You can make one fish or connect three fish vertically as a charm.
- For smoother shaping, use neat decreases. If your decreases look bulky, you can review a helpful tutorial on the invisible decrease crochet technique.
Pattern Instructions
Fish Body
Work in continuous rounds. Start with your chosen fish color.
- Rnd 1: 6 sc in MR. [6]
- Rnd 2: (sc, inc) ×3 . [9]
- Rnd 3: (sc, inc, sc) ×3 . [12]
- Rnd 4: (3 sc, inc) ×3 . [15]
- Rnd 5–8: sc around. [15]
Start stuffing the fish lightly. Do not add too much stuffing. The fish should keep a small, slightly flat charm shape.
- Rnd 9: (3 sc, dec) ×3 . [12]
- Rnd 10: dec ×6. [6] This forms the narrow part before the tail.
- Rnd 11: inc ×6. [12] Now make the tail edge.
- Rnd 12: (3 hdc in the next stitch, sl st in the next stitch, sk 1) ×4 . FO and weave in the end.
This creates a small wavy tail edge. Try not to pull the stitches too tightly in the final round, because the tail should look soft and rounded. If you need extra help with the hdc stitch used in the tail, you can follow a simple guide on how to half double crochet.
Eyes
Attach or sew one small black eye on each side near the front of the fish. If using safety eyes, insert them before fully closing the body. Make sure they are placed evenly on both sides. If using black beads, sew them on after finishing the fish. Secure them very well, especially if the charm will be attached to a bag or keys.
Embroidered Stripes
Using 2 strands of brown embroidery thread, stitch simple wavy or vertical stripes on both sides of the fish. You can make:
- 2 or 3 short brown stripes near the middle of the body
- One tiny mouth stitch near the front if desired
- Small curved lines to make the fish look more like a mini taiyaki
Sew the stripes on both sides, and this detail really helps the charm look finished. Keep the embroidery simple because the fish is very small.
Assembly
To make the charm version, make 3 fish in different colors. For example:
- 1 white fish
- 1 yellow fish
- 1 light brown fish
Connect them vertically using small jump rings. Add a keychain ring at the top and a small charm at the bottom if you like. You can also make only one fish and attach it directly to a keyring. This is a lovely option for a quick handmade gift or market item.
Assembly Tips
Before adding the keychain hardware, check the shape of the fish from both sides. The body should look slightly rounded but not too bulky. The tail should stay visible and gently textured. If the body looks too full, use less stuffing next time. When attaching jump rings, avoid pulling directly through loose embroidery. It is better to attach the ring through a firm stitch near the top of the fish body or use a small loop made from yarn.
Tips
- Use a smaller hook if your stitches look too loose. Small amigurumi charms need tight stitches so the stuffing does not show through.
- Keep your stuffing light. This is one of the most important parts of this pattern. Overstuffing can make the fish too round and may hide the taiyaki-style shape.
- Use thin embroidery thread for the stripes. Thick yarn can overwhelm the tiny fish body.
- Make the eyes small. Large eyes can be cute, but for this mini charm, small black eyes or beads keep the design balanced.
- Weave in all ends securely. Especially if the charm will be used on keys, bags, or backpacks.
FAQs
Is this Mini Taiyaki Fish Crochet Charm Pattern beginner-friendly?
Yes, this pattern is beginner-friendly if you already know how to work in continuous rounds, make increases, make decreases, and sew small details.
Can I use plush yarn for this fish?
You can, but the fish will become larger and rounder. For a small keychain charm, 4-ply cotton yarn or similar yarn is better.
Why should I stuff the fish lightly?
The fish should stay small and slightly flat. If you add too much stuffing, the body may become too bulky and lose the mini taiyaki shape.
Can I make this fish without safety eyes?
Yes. You can use black beads, embroidery, or small felt circles instead of safety eyes.
How many fish should I make for the charm?
You can make one fish for a simple keychain, or make three fish in different colors and connect them vertically with jump rings.
Can I sell finished items from this pattern?
Yes, you can sell finished handmade fish charms made from this pattern. Please do not copy or redistribute the written pattern as your own.
Pin This Crochet Pattern!