It is incredibly common to panic when you realize you are about to crochet 70 rounds of single crochet without stopping. Many beginners worry that a project this long will become a tangled mess or that the tension will drift, ruining the shape. But here is the secret: this pattern is designed to be meditative. The repetitive nature of the long neck section actually helps you master consistent tension, and because the body, neck, and head are worked as one continuous piece, you avoid the frustration of sewing separate parts together later. Once you get past that initial intimidation, you will find that creating Sid’s iconic silhouette is surprisingly straightforward.
Maker Notes
What makes this specific amigurumi design so charming is the exaggerated proportion. Sid the Sloth is beloved for his goofy, lanky appearance, and this pattern captures that perfectly by extending the neck significantly. When choosing your yarn, I recommend a cotton or cotton-blend variety. While acrylic is soft, cotton holds its shape better and prevents the “floppy” look that can sometimes happen with long, unstuffed sections. The BLO (back loop only) technique used in the arms and legs creates a distinct ridge that mimics the texture of a sloth’s fur, adding a professional touch to your handmade toy. This project is a wonderful way to practice continuous rounds and invisible decreases while creating a character that is sure to bring a smile to any room.
Project Overview
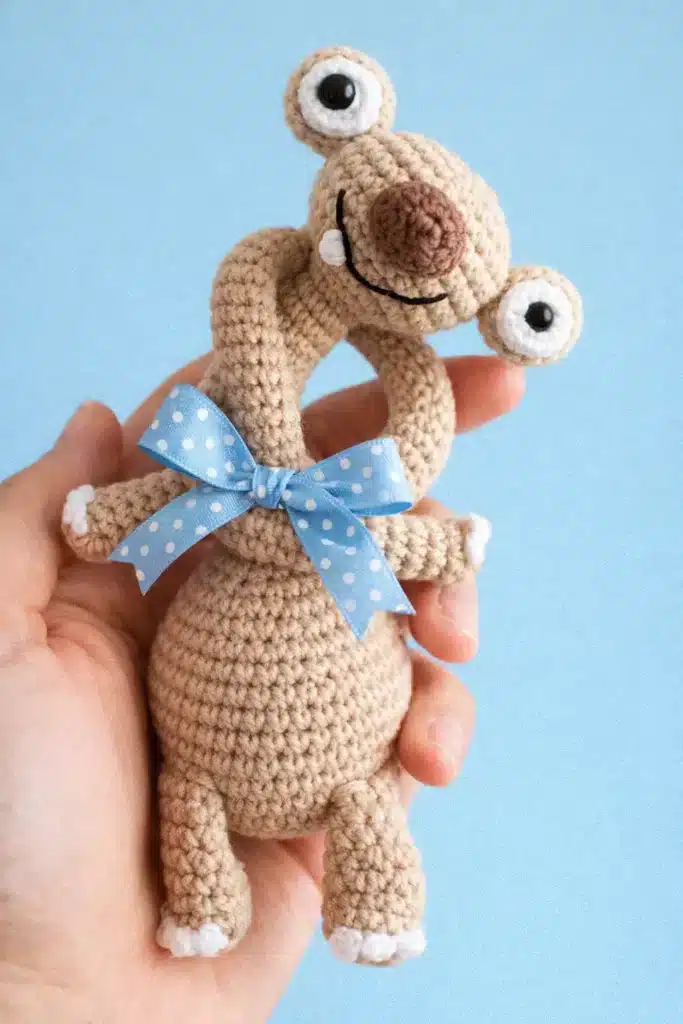
This pattern creates a long-neck Sid amigurumi, inspired by the character from Ice Age. The design features a unique construction method where the body, neck, and head are crocheted as a single continuous piece. This reduces assembly time and ensures a seamless transition between the torso and the elongated neck. The project includes separate limbs and facial features that are attached at the end to create Sid’s expressive, goofy look.
Materials
- Yarn Colors: Brown (main body), White (eyes), Dark Brown (nose), Optional Black (smile detail).
- Hook Size: 2.0–2.5 mm.
- Stuffing: Fiberfill.
- Tools: Yarn needle, stitch marker, scissors.
- Optional: Thin wire or pipe cleaner for neck stability.
Yarn Tip: If you want a firmer doll shape, choose a cotton or cotton-blend yarn and keep stitches tight. If you need help choosing yarn and hook combinations, see the Yarn Weight, Gauge, and Hook Size Guide.
Gauge and Finished Size
There is no strict gauge requirement for this pattern, as the final size is determined by your tension, yarn thickness, and hook size. However, with the recommended setup (2.0–2.5 mm hook and standard worsted or DK weight yarn), Sid is usually around 25–32 cm (10–12.5 inches) tall.
Abbreviations
The entire pattern is written in US crochet terms.
- MR: Magic ring
- sc: Single crochet
- inc: Increase (2 sc in same stitch)
- dec: Invisible decrease (sc2tog)
- sl st: Slip stitch
- BLO: Back loop only
- ch: Chain
- dc: Double crochet
- FO: Fasten off
If you use UK terms, keep this conversion reference nearby: US vs UK Crochet Terms Conversion Chart.
Pattern Notes
- Work in continuous rounds unless stated otherwise.
- Use a stitch marker in the first stitch of each round.
- Stitch counts are shown in ( ) at the end of each round.
- For the neck section, keep stuffing minimal or none (as specified in the pattern) to preserve the long, flexible look.
- Skill Level: Beginner to Intermediate (mainly because of shaping + assembly precision).
Pattern Instructions
Body + Neck + Head (One Piece)
In this long neck Sid crochet pattern, we build the body, long neck, and head as one continuous piece. This gives Sid that iconic silhouette and makes assembly easier later. Work in continuous rounds. Stitch count is shown in ( ) at the end of each round.
Start at body base
R1: MR, 6 sc (6)
R2: inc ×6 (12)
R3: (1 sc, inc) ×6 (18)
R4: (2 sc, inc) ×6 (24)
R5: (3 sc, inc) ×6 (30)
R6: (4 sc, inc) ×6 (36)
R7: (5 sc, inc) ×6 (42)
Create base shaping line
R8: BLO, 42 sc (42)
R9–R12: 42 sc (42)
Shape upper body
R13: (5 sc, dec) ×6 (36)
R14: (4 sc, dec) ×6 (30)
R15: (3 sc, dec) ×6 (24)
R16: 24 sc (24)
R17: (2 sc, dec) ×6 (18)
R18: 18 sc (18) (Stuff body firmly up to here.)
R19: dec ×9 (9)
Long neck section
R20–R89: 9 sc (9) (Do NOT stuff the neck.)
Head shaping
R90: inc ×9 (18)
R91: (2 sc, inc) ×6 (24)
R92: (3 sc, inc) ×6 (30)
R93: (4 sc, inc) ×6 (36)
R94–R99: 36 sc (36)
R100: (4 sc, dec) ×6 (30)
R101: (3 sc, dec) ×6 (24)
R102: (2 sc, dec) ×6 (18)
R103: (1 sc, dec) ×6 (12) (Start stuffing head)
R104: dec ×6 (6)
FO, leave a long tail, and close the opening with a yarn needle.
Arms (Make 2)
R1: MR, 5 sc (5)
R2: inc ×5 (10)
R3: BLO, 10 sc (10)
R4–R8: 10 sc (10)
R9: (3 sc, dec) ×2 (8)
R10: 8 sc (8)
Flatten the top and close with 4 sc through both layers. FO, leave a long tail for sewing. Optional detail: Embroider 3 tiny fingers on the BLO ridge.
Legs (Make 2)
R1: MR, 6 sc (6)
R2: inc ×6 (12)
R3: BLO, 12 sc (12)
R4–R6: 12 sc (12)
R7: (2 sc, dec) ×3 (9)
R8: 9 sc (9)
Lightly stuff only the lower part. Flatten and close opening with sc through both layers. FO, leave a long tail for sewing. Optional detail: Embroider 3 small toes on the BLO ridge.
Eyes (Make 2 Complete Eyes)
For this Sid the sloth amigurumi pattern, each eye has a white inner piece and brown outer piece.
White Inner Part
R1: MR, 8 sc (8)
R2: inc ×8 (16)
R3: (2 sc, dec) ×4 (12)
FO.
Brown Outer Part
R1: MR, 9 sc (9)
R2: inc ×9 (18)
R3: (4 sc, dec) ×3 (15)
sl st, FO.
Place the white part inside the brown part, then sew or glue securely.
Nose (Make 1)
R1: MR, 5 sc (5)
R2: inc ×5 (10)
R3: (4 sc, inc) ×2 (12)
FO, leave a long tail for sewing.
Teeth (White Yarn, Make 2)
For each tooth:
ch 3 dc in 3rd ch from hook
FO, leave tail for sewing
Sew both teeth under the smile line with a tiny gap between them.
Assembly
At this stage, you should have: 1 body/neck/head piece, 2 arms, 2 legs, 2 completed eyes, 1 nose, and 2 teeth.
1) Assemble the Body First
Use pins or stitch markers to preview placement before sewing. Legs: sew both legs to the BLO ridge from R8 (front-center of body). Arms: sew around R16–R18 on each side. Keep left/right symmetry by counting stitches from center front.
2) Build Sid’s Face
For a clean “Sid” look, place features in this order:
- Nose in face center around R95–R97
- Eyes above nose around R94–R95, with about 6–7 stitches between inner edges
- Smile embroidered as a curved line under the nose
- Teeth sewn under smile with a tiny gap between both teeth
Expression tip: Eyes slightly closer = cuter/cartoon style. Eyes slightly wider = goofier Sid look.
3) Neck Stability (Optional but Recommended)
Your pattern already works without support, but if you want a display piece, add support inside the neck:
- Use a thin wire or folded pipe cleaner.
- Insert through neck center before final tightening.
- Keep both wire ends bent inward (no sharp edges).
- Add a tiny bit of fiberfill around support if needed.
This helps the long neck stand cleaner while keeping a natural bend.
4) Finishing Details
Weave in all ends securely inside the body/head. Double-check seam strength at arms/legs. Shape the head gently with fingers for smoother contours. Optional: add tiny black embroidered nostrils or subtle cheek dots.
Tips
- Keep neck stitches tight to avoid gaps.
- Stuff only the body and head well; keeping the neck unstuffed helps preserve the “long-neck” look.
- If you want a standing/display version, add a thin wire or pipe cleaner inside the neck before final closing.
FAQs
Is the Long Neck Sid crochet pattern beginner-friendly?
Yes. It’s suitable for advanced beginners to intermediate crocheters. The stitches are simple, but shaping, long-neck structure, and facial placement require careful counting and assembly.
What stitches are used in the Sid the Sloth pattern?
This pattern uses: MR (magic ring), sc, inc, dec (invisible decrease), sl st, BLO, ch, dc, and FO.
What yarn and hook size should I use for a long neck Sid amigurumi?
Use brown, white, and dark brown yarn (optional black for smile detail) with a 2.0–2.5 mm hook. Cotton or cotton-blend yarn gives cleaner stitch definition and better shape control.
How tall is the finished Long Neck Sid?
Size depends on yarn, hook, and tension. With the recommended setup, Sid is usually around 25–32 cm (10–12.5 inches) tall.
Are the instructions written in US or UK crochet terms?
The entire pattern is written in US crochet terms.
Can I sell items made from this Sid crochet pattern?
You can usually sell finished handmade items in small quantities with credit to the pattern source. Do not resell, copy, or redistribute the pattern text/PDF itself.
Pin This Crochet Pattern!