There is something deeply satisfying about the quiet rhythm of amigurumi. A small ball of yarn, a hook that fits perfectly in your hand, and the gentle counting of stitches as you build a shape from nothing. This Mini Cow Amigurumi Pattern is perfect for those cozy evening rituals where you want to create something tangible and sweet. As you work through the rounds, you will find yourself relaxing into the repetitive motion of single crochet, increases, and decreases, crafting a little farm friend that is ready to bring joy to any shelf or bag.
Small Details That Make It Better
What truly elevates this mini cow is the thoughtful construction of its features. The white muzzle is not just a patch of color; it is a carefully placed area that gives the cow its expressive face, especially when paired with the 5 mm safety eyes. The decision to attach the arms directly into the body during the final rounds of the torso creates a seamless, sturdy look that holds up well to handling. Additionally, the overalls are worked into the unused front loops of the body, a technique that adds a structured, denim-like edge to the soft body without requiring complex sewing later. These small technical choices result in a finished toy that looks polished and professional.
Project Overview
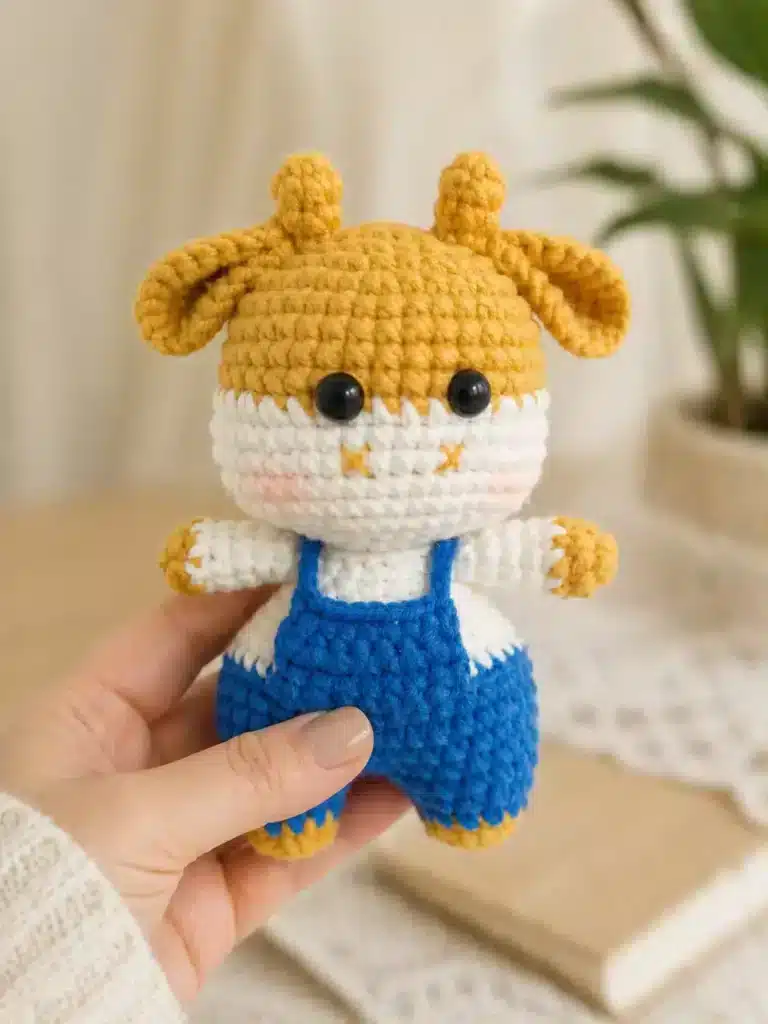
This Mini Cow Amigurumi Pattern is a lovely project if you enjoy cute farm animals, small crochet toys, or quick amigurumi gifts. The shape is compact, the arms are attached while crocheting the body, and the overalls are added with a simple front-loop bib. You can keep the classic mustard, white, and blue combination, or change the colors to create a strawberry cow, chocolate cow, pastel cow, or baby farm cow. If you enjoy making cute character-style animals, you may also like the soft toy style in my Three Bare Bears crochet pattern, especially if you want more mini doll ideas for your collection.
This project is best for confident beginners or intermediate beginners. The main techniques are single crochet, increases, decreases, color changes, BLO stitches, and sewing small pieces.
Materials
To make this Mini Cow Amigurumi Pattern, you will need:
- Hook size: 2.0 mm to 2.5 mm crochet hook
- Yarn weight: Sport weight, light DK, or milk cotton yarn
- Mustard yellow / caramel yarn: head top, ears, horns, hands, and feet
- White yarn: muzzle, body, and arms
- Blue yarn: overalls
- Black safety eyes: 5 mm or similar size
- Pink blush: optional, for cheeks
- Fiberfill stuffing
- Yarn needle
- Stitch marker
- Scissors
- Pins for positioning pieces before sewing
If you are unsure which yarn and hook combination to choose, my yarn weight, gauge, and hook size guide can help you understand how hook size changes the final size and firmness of your amigurumi.
Gauge and Finished Size
Specific gauge and finished size measurements are not provided for this pattern. The size will vary slightly based on your tension and the specific yarn weight used. Using a smaller hook than your yarn label recommends helps keep the stitches tight and prevents stuffing from showing.
Abbreviations
This pattern uses US crochet terms.
- MR = magic ring
- sc = single crochet
- inc = 2 sc in the same stitch
- dec = invisible decrease / sc2tog
- ch = chain
- sl st = slip stitch
- BLO = back loop only
- FO = fasten off
For a broader reference, the Craft Yarn Council has a helpful crochet abbreviations master list.
Pattern Notes
Work in continuous rounds unless stated otherwise. Use a stitch marker to mark the first stitch of each round. Stuff the head and body firmly, but do not overstuff the arms, ears, or horns. The head includes mustard yellow and white color changes to form the muzzle. The overalls bib is worked later into the unused front loops from the body. The arms are crocheted directly into the body on Round 16. You can embroider the nose and mouth after the head is stuffed.
If color changes are still new for you, my guide on changing colors in amigurumi will help you keep the muzzle area cleaner and neater.
Pattern Instructions
Head
Start with mustard yellow yarn.
Rnd 1: 8 sc in MR. [8]
Rnd 2: inc x8. [16]
Rnd 3: (sc, inc) x8. [24]
Rnd 4: (sc, inc, sc) x8. [32]
Rnd 5: (4 sc, inc) x2, 5 sc, inc, (4 sc, inc) x2, 5 sc, inc. [38]
Rnd 6–9: sc around. [38]
Now begin the white muzzle color changes. The stitches in white create the muzzle area.
Rnd 10: 9 sc in yellow, 6 inc in white, 8 sc in white, 6 inc in white, 9 sc in yellow. [50]
Rnd 11–14: 9 sc in yellow, 32 sc in white, 9 sc in yellow. [50]
Rnd 15: 9 sc in yellow, 6 dec in white, 8 sc in white, 6 dec in white, 9 sc in yellow. [38]
Rnd 16: 2 sc, dec, 3 sc, dec, work (3 sc, dec) x4 in white, 3 sc, dec, 2 sc, dec. [30]
Rnd 17: 3 sc, dec, 2 sc, work sc, dec, (3 sc, dec) x2, 2 sc in white, 2 sc, dec, 3 sc. [24]
Rnd 18: 2 sc, dec, 2 sc, work dec, (2 sc, dec) x2, 2 sc in white, dec, 2 sc, dec. [18]
Stuff the head firmly.
FO, leaving a long tail for sewing.
Add the safety eyes before closing the head completely. Place them around the white/yellow face area, making sure the expression looks balanced from the front.
Embroider a small nose and mouth with mustard yarn. Add soft pink blush to the cheeks if desired.
For the decreasing rounds, use invisible decreases when possible. This gives the head a smoother shape. You can review my invisible decrease crochet tutorial if you want the closing rounds to look cleaner.
Arms — Make 2
Start with mustard yellow yarn.
Rnd 1: 6 sc in MR. [6]
Rnd 2: (2 sc, inc) x2. [8]
Change to white yarn.
Rnd 3–7: sc around. [8]
Flatten the arm. Do not overstuff.
FO the first arm. Keep both arms ready because they will be attached while crocheting the body.
Legs + Body
First Leg
Start with mustard yellow yarn.
Rnd 1: 6 sc in MR. [6]
Rnd 2: inc x6. [12]
Change to blue yarn.
Rnd 3–4: sc around. [12]
FO the first leg.
Second Leg
Make the second leg the same way, but do not cut the yarn after Round 4.
Chain 3 and join to the first leg.
Rnd 5: 12 sc around first leg, 3 sc across the chain, 12 sc around second leg, 3 sc across the other side of the chain. [30]
Rnd 6: (2 sc, inc, 2 sc) x6. [36]
Rnd 7–9: sc around. [36]
Change to white yarn and work in BLO.
Rnd 10: BLO sc around. [36]
Rnd 11: 6 sc, dec, 16 sc, dec, 10 sc. [34]
Rnd 12: 4 sc, dec x2, 14 sc, dec x2, 8 sc. [30]
Rnd 13: (2 sc, dec, 2 sc) x5. [25]
Rnd 14: 10 sc, dec, 13 sc. [24]
Rnd 15: (2 sc, dec) x6. [18]
Attach the arms in the next round.
Rnd 16: 2 sc, crochet the first arm together with the body for 4 sc, 5 sc, crochet the second arm together with the body for 4 sc, 3 sc. [18]
FO, leaving a long tail.
Stuff the body firmly. Sew the head to the body.
When attaching small arms or checking the placement before sewing, my guide on attaching amigurumi limbs evenly is useful for keeping both sides balanced.
Horns — Make 2
Use mustard yellow or a slightly darker caramel color.
Rnd 1: 4 sc in MR. [4]
Rnd 2: (sc, inc) x2. [6]
Rnd 3: sc around. [6]
Rnd 4: (2 sc, inc) x2. [8]
FO, leaving a long tail. Stuff lightly and sew the horns to the top of the head.
Ears — Make 2
Use mustard yellow yarn.
Rnd 1: 6 sc in MR. [6]
Rnd 2: inc x6. [12]
Rnd 3: (sc, inc) x3.
FO, leaving a long tail. Flatten the ears and sew them to both sides of the head.
Overalls Bib + Straps
Use blue yarn. Go back to the unused front loops from Body Round 10. At the center front, attach blue yarn and work:
Row 1: 10 sc across the front loops.
Row 2–4: ch 1, turn, 10 sc across.
Straps
From the top corners of the bib, chain 16 for each strap.
Sew or slip stitch each strap to the back of the overalls.
You can keep the straps simple, or cross them at the back for a cute handmade finish. For another sweet small-animal project with a tiny accessory, you may like the mini bunny with carrot bag crochet pattern.
Assembly
To finish your Mini Cow Amigurumi Pattern, follow these steps:
- Sew the head firmly to the body.
- Sew the horns on top of the head.
- Sew the ears to both sides of the head.
- Embroider the small nose and mouth on the white muzzle.
- Add soft pink blush to the cheeks.
- Sew or secure the overalls straps at the back.
- Add a small decorative patch on the front of the overalls if desired.
Take your time with the face. A tiny change in eye placement, nose shape, or blush position can completely change the expression of your cow.
Tips
- Use a smaller hook than your yarn label recommends. This keeps the stitches tight and prevents stuffing from showing.
- Stuff the head firmly, especially around the muzzle area. A well-stuffed head helps the cow keep its round shape.
- Pin the horns and ears before sewing. This helps you check the symmetry from the front, side, and top.
- Do not overstuff the arms. Flat arms are easier to crochet into the body and look better on a mini doll.
- Keep your overalls bib centered. Use the middle front stitches from Body Round 10 so the bib sits neatly under the face.
- For very small amigurumi, counting rounds carefully makes a big difference. My guide on how to count rounds in crochet can help if you often lose your place while working in spirals.
FAQs
Is this Mini Cow Amigurumi Pattern beginner-friendly?
Yes, this pattern is suitable for confident beginners. You should already know how to make a magic ring, single crochet, increase, decrease, change colors, and sew small amigurumi parts.
What yarn is best for this mini cow?
Sport weight, light DK, or milk cotton yarn works well. Cotton yarn gives a clean stitch definition, while milk cotton gives a softer, smoother look.
Can I make this cow bigger?
Yes. Use thicker yarn and a larger hook. The stitch counts stay the same, but the final cow will become larger.
Can I turn this mini cow into a keychain?
Yes. Sew a keychain loop or metal ring securely to the top of the head. Make sure the head and body are sewn tightly if the cow will be used on a bag.
Can I change the overalls color?
Of course. Blue gives a classic farm look, but you can use pink, green, yellow, red, brown, or pastel colors.
Pin This Crochet Pattern!