It is incredibly common to worry about making a mistake when you first start crocheting amigurumi, especially when dealing with color changes or stuffing a large body. You might fear that your stitches will be too loose or that the shape won’t come out right. However, this Brown Calf Amigurumi pattern is designed to be forgiving and approachable. By following the step-by-step instructions and using simple shaping techniques, you can create a charming farm animal that looks professional and polished, even if you are still mastering the basics.
Maker Notes
What makes this calf pattern truly special is the balance between its rustic farm aesthetic and its soft, cuddly appeal. The white markings on the face and belly give the calf a gentle, expressive look that stands out against the rich brown body. I love how the optional vest adds a layer of personality, turning a simple animal into a character with a story. When selecting your yarn, I recommend using a soft cotton or acrylic blend to ensure the toy remains durable for play while maintaining that plush, handmade texture. The contrast between the brown body and the white face patch creates a focal point that draws the eye, making this a delightful centerpiece for a nursery shelf or a farm-themed collection.
Project Overview
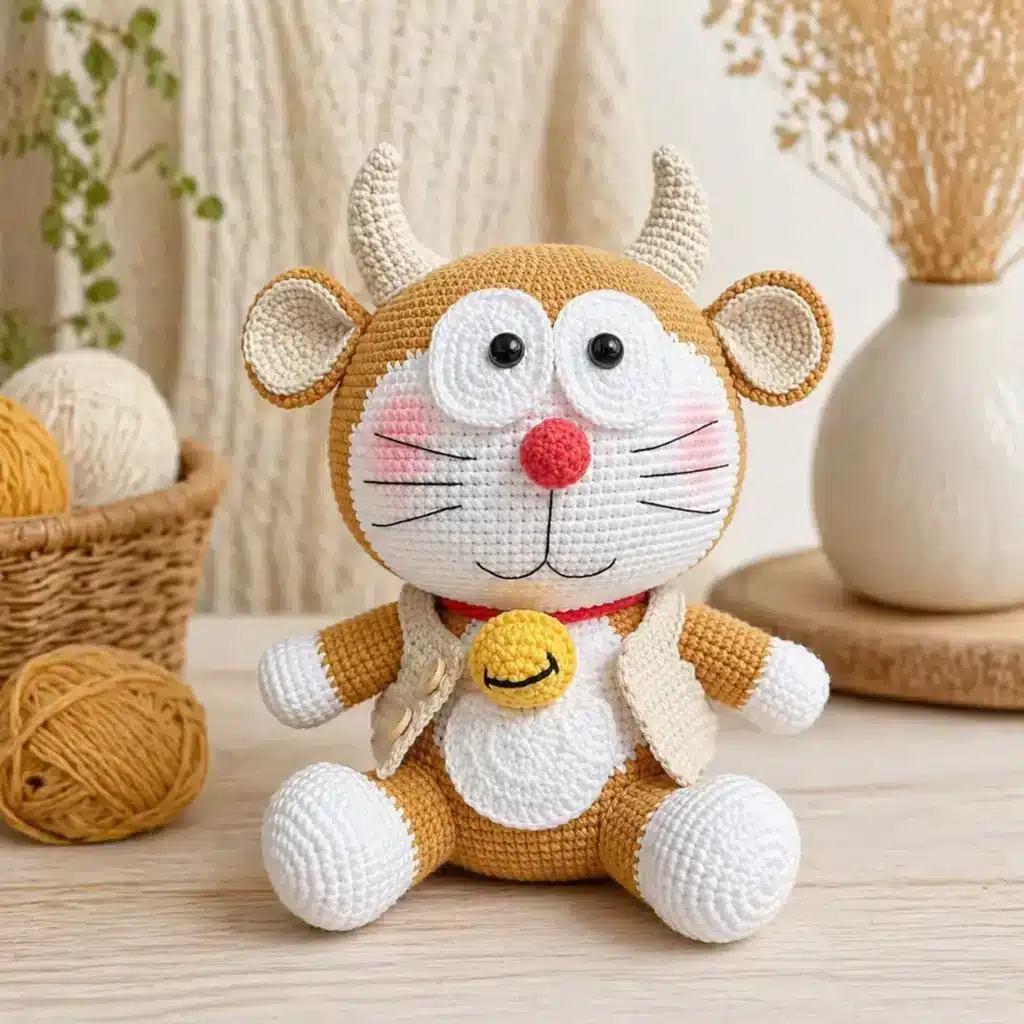
This Brown Calf Crochet Pattern is perfect if you enjoy amigurumi animals with character. The white face patch makes the calf look gentle and expressive, while the tiny horns and vest add a charming handmade finish. You can use this finished calf as:
- A handmade farm animal toy
- A nursery shelf decoration
- A baby shower gift
- A cute market-table amigurumi
- A farm-themed crochet collection piece
- A matching friend for cow, bear, bunny, or tiger amigurumi dolls
Skill Level
Intermediate beginner to intermediate. This pattern includes basic amigurumi stitches, color changes, shaping, sewing, and several separate pieces. If you already know how to work single crochet, increases, decreases, and simple amigurumi assembly, you can follow it step by step. If you are new to basic stitches, review a guide on how to single crochet before starting. For the vest section, you may also find a tutorial on how to half double crochet useful.
Finished Size
The final size depends on your yarn, hook, and tension. With a 2.0 mm hook and sport or fine cotton yarn, your calf will usually become a medium-small amigurumi toy. Using thicker yarn will make a larger plush-style calf. If you want to understand how yarn thickness changes the final size, you can check guides about yarn weight, gauge, and hook size. For general yarn sizing references, the Craft Yarn Council yarn standards are also helpful when choosing a substitute yarn.
Materials
- 2.0 mm crochet hook
- Brown yarn for the main body, head, arms, legs, and outer ears
- White yarn for hooves, face area, belly area, eyes, and pocket
- Soft pink yarn for the nose and inner ears
- Cream or beige yarn for the horns
- Brown yarn for the tail
- White or cream yarn for the tail tip
- Beige, cream, gray, or dark brown yarn for the vest
- 10 mm safety eyes
- Fiberfill stuffing
- Black or dark brown embroidery thread
- Yarn needle
- Stitch marker
- Scissors
Abbreviations — US Crochet Terms
- MR = magic ring
- ch = chain
- sc = single crochet
- inc = increase, 2 sc in the same stitch
- dec = decrease
- sl st = slip stitch
- hdc = half double crochet
- hdc inc = 2 hdc in the same stitch
- dc = double crochet
- dc inc = 2 dc in the same stitch
- FO = fasten off
If your decreases leave visible gaps, my guide to the invisible decrease in crochet can help make the calf smoother and cleaner.
Pattern Notes
- Work in continuous rounds unless the pattern says otherwise. Use a stitch marker to mark the first stitch of each round.
- Stuff the legs, body, head, nose, horns, and tail lightly to firmly depending on the part.
- The main color of this calf is brown, while the white sections create the hooves, belly, and face details.
- When changing from brown to white or pink, keep your tension even so the color section stays smooth. For extra help, you can review a guide about changing colors in amigurumi.
Pattern Instructions
Legs ×2
Start with white yarn for the hooves.
Rnd 1: 8 sc in MR [8]
Rnd 2: inc ×8 [16]
Rnd 3: (sc, inc) ×8 [24]
Rnd 4: (2 sc, inc) ×8 [32]
Rnd 5: inc, 5 sc, (inc, 4 sc) ×3, sc, (inc, 4 sc) ×2 [38]
Rnd 6–9: 38 sc [38]
Rnd 10: 32 sc, dec, 2 sc, dec [36]
Rnd 11: 11 sc, (sc, dec) ×4, 13 sc [32]
Rnd 12: 10 sc, dec ×4, 14 sc [28]
Change to brown yarn.
Rnd 13–17: 28 sc [28]
Stuff the legs. FO, leaving a long tail for sewing if needed.
Arms ×2
Start with white yarn.
Rnd 1: 8 sc in MR [8]
Rnd 2: inc ×8 [16]
Rnd 3: (sc, inc) ×8 [24]
Rnd 4–7: 24 sc [24]
Rnd 8: (2 sc, dec) ×6 [18]
Change to brown yarn.
Rnd 9: 18 sc [18]
Rnd 10: inc, 17 sc [19]
Rnd 11–17: 19 sc [19]
Stuff lightly. FO if you prefer sewing the arms later, or keep them ready to join to the body.
Nose
Use soft pink yarn.
Rnd 1: 6 sc in MR [6]
Rnd 2: inc ×6 [12]
Rnd 3: (3 sc, inc) ×3 [15]
Rnd 4: 15 sc [15]
Rnd 5: (sc, dec) ×5 [10]
Stuff lightly. FO, leaving a long tail for sewing.
Body
Use brown yarn as the main color. The white stitches create the belly area.
Rnd 1: ch 12, starting in 2nd ch from hook: 10 sc, 3 sc in last ch, work on the other side of the chain: 9 sc, inc [24]
Rnd 2: inc, 9 sc, inc ×3, 9 sc, inc ×2 [30]
Rnd 3: sc, inc, 9 sc, (sc, inc) ×3, 9 sc, (sc, inc) ×2 [36]
Rnd 4: sc, inc, sc, 9 sc, (sc, inc, sc) ×3, 9 sc, (sc, inc, sc) ×2 [42]
Rnd 5: 3 sc, inc, 9 sc, (3 sc, inc) ×3, 9 sc, (3 sc, inc) ×2 [48]
Rnd 6: 2 sc, inc, 2 sc, 9 sc, (2 sc, inc, 2 sc) ×3, 9 sc, (2 sc, inc, 2 sc) ×2 [54]
Rnd 7: 5 sc, inc, 9 sc, (5 sc, inc) ×3, 9 sc, (5 sc, inc) ×2 [60]
Rnd 8: 3 sc, inc, 3 sc, 9 sc, (3 sc, inc, 3 sc) ×3, 9 sc, (3 sc, inc, 3 sc) ×2 [66]
Rnd 9: 7 sc, inc, 9 sc, (7 sc, inc) ×3, 9 sc, (7 sc, inc) ×2 [72]
Rnd 10: 4 sc, inc, 4 sc, 9 sc, (4 sc, inc, 4 sc) ×3, 9 sc, (4 sc, inc, 4 sc) ×2 [78]
Rnd 11: inc, 26 sc, inc, 50 sc [80]
Rnd 12–15: 80 sc [80]
Rnd 16: 6 sc, dec, 23 sc, dec, 13 sc, dec, 13 sc, dec, 17 sc [76]
Now start the white belly section.
Rnd 17: 47 brown sc, 11 white sc, 18 brown sc [76]
Rnd 18: 45 brown sc, 15 white sc, 16 brown sc [76]
Rnd 19: 13 brown sc, dec, 15 brown sc, dec, 12 brown sc, 13 white sc, dec, 2 white sc, 13 brown sc, dec [72]
Rnd 20–21: 41 brown sc, 18 white sc, 13 brown sc [72]
Rnd 22: 5 sc, dec, (10 sc, dec) ×2, 9 sc, dec, 10 sc, dec, 5 sc, dec, 5 sc [66]
Rnd 23–24: 36 brown sc, 20 white sc, 10 brown sc [66]
Rnd 25: (9 sc, dec) ×3, 3 sc, 6 white sc, dec, 9 white sc, dec, sc, 8 sc, dec [60]
Now attach the arms.
Rnd 26: 24 sc, 6 sc through arm 1 and body together, 3 sc, 18 sc, 3 sc, 6 sc through arm 2 and body together [60]
Rnd 27: 24 sc, 13 sc around the remaining stitches of arm 1, 3 sc, 18 sc, 3 sc, 13 sc around the remaining stitches of arm 2 [74]
Rnd 28: 30 sc, dec, 8 sc, 18 white sc, 7 sc, dec, 7 sc [72]
Rnd 29: 5 sc, dec, (10 sc, dec) ×2, 8 sc, 2 white sc, dec, 10 white sc, dec, 2 white sc, 8 sc, dec, 5 sc [66]
Rnd 30: (9 sc, dec) ×3, 3 sc, 6 white sc, dec, 8 white sc, 6 sc, dec, 4 sc, dec [60]
Rnd 31: 4 sc, dec, (8 sc, dec) ×2, 7 sc, sc, dec, 8 white sc, dec, 2 white sc, 6 sc, dec, 4 sc [54]
Rnd 32: (7 sc, dec) ×3, 3 sc, 4 white sc, dec, 7 white sc, 3 sc, dec, 4 sc, dec [48]
Rnd 33: 27 brown sc, 12 white sc, 9 brown sc [48]
Stuff firmly. FO, leaving a long tail for sewing.
Head
Use brown yarn as the main color. The white stitches create the face area.
Rnd 1: ch 9, starting in 2nd ch from hook: 7 sc, 3 sc in last ch, work on the other side: 6 sc, inc [18]
Rnd 2: inc, 6 sc, inc ×3, 6 sc, inc ×2 [24]
Rnd 3: sc, inc, 6 sc, (sc, inc) ×3, 6 sc, (sc, inc) ×2 [30]
Rnd 4: inc, 2 sc, 6 sc, (inc, 2 sc) ×3, 6 sc, (inc, 2 sc) ×2 [36]
Rnd 5: 3 sc, inc, 6 sc, (3 sc, inc) ×3, 6 sc, (3 sc, inc) ×2 [42]
Rnd 6: inc, 4 sc, 6 sc, (inc, 4 sc) ×3, 6 sc, (inc, 4 sc) ×2 [48]
Rnd 7: 5 sc, inc, 6 sc, (5 sc, inc) ×3, 6 sc, (5 sc, inc) ×2 [54]
Rnd 8: (4 sc, inc, 4 sc) ×6 [60]
Rnd 9: (9 sc, inc) ×6 [66]
Rnd 10: (5 sc, inc, 5 sc) ×6 [72]
Rnd 11: (11 sc, inc) ×6 [78]
Rnd 12: (6 sc, inc, 6 sc) ×6 [84]
Rnd 13: 84 sc [84]
Rnd 14: (13 sc, inc) ×6 [90]
Rnd 15: 90 sc [90]
Rnd 16: (7 sc, inc, 7 sc) ×6 [96]
Now begin the white face section.
Rnd 17: 53 brown sc, 22 white sc, 21 brown sc [96]
Rnd 18: (15 sc, inc) ×3, 3 brown sc, 12 white sc, inc, 13 white sc, 2 brown sc, inc, 15 brown sc, inc [102]
Rnd 19: 52 brown sc, 31 white sc, 19 brown sc [102]
Rnd 20: 8 sc, inc, (16 sc, inc) ×2, 8 sc, 8 white sc, inc, 16 white sc, inc, 7 white sc, 9 sc, inc, 8 sc [108]
Rnd 21–23: 53 brown sc, 37 white sc, 18 brown sc [108]
Rnd 24–33: 52 brown sc, 39 white sc, 17 brown sc [108]
Rnd 34: 8 sc, dec, (16 sc, dec) ×2, 6 sc, 10 white sc, dec, 16 white sc, dec, 9 white sc, 7 sc, dec, 8 sc [102]
Rnd 35: 49 brown sc, 37 white sc, 16 brown sc [102]
Rnd 36: (15 sc, dec) ×2, 15 sc, 2 white sc, dec, 13 white sc, dec, 15 white sc, dec, sc, 14 brown sc, dec [96]
Rnd 37: 47 brown sc, 34 white sc, 15 brown sc [96]
Rnd 38: 7 sc, dec, (14 sc, dec) ×2, 6 sc, 8 white sc, dec, 14 white sc, dec, 8 white sc, 6 sc, dec, 7 sc [90]
Rnd 39: (13 sc, dec) ×2, 11 sc, dec, sc, sc, (13 sc, dec) ×2, sc, 12 sc, dec [84]
Rnd 40: (5 sc, dec) ×5, 3 sc, dec, sc, sc, (5 sc, dec) ×4, sc, 4 sc, dec, 5 sc, dec [72]
Rnd 41: 7 sc, dec, 9 sc, 7 sc, dec, 5 sc, dec, sc, 8 sc, dec, 16 sc, sc, dec, 6 sc, dec [66]
Rnd 42: dec, 15 sc, dec, 6 sc, dec, 5 sc, sc, dec, 15 sc, dec, 5 sc, sc, dec, 6 sc [60]
Rnd 43: 5 sc, dec, 14 sc, dec, 3 sc, dec, sc, 6 sc, dec, 15 sc, dec, 4 sc, dec [54]
Rnd 44: dec, 13 sc, dec, 4 sc, dec, 3 sc, sc, dec, 13 sc, dec, 4 sc, dec, 4 sc [48]
Rnd 45: 24 brown sc, 18 white sc, 6 brown sc [48]
Stuff firmly. FO, leaving a long tail for sewing.
Eyes ×2
Use white yarn.
Rnd 1: ch 5, starting in 2nd ch from hook: 3 sc, 3 sc in last ch, work on the other side: 2 sc, inc [10]
Rnd 2: inc, 2 sc, inc ×3, 2 sc, inc ×2 [16]
Rnd 3: sc, inc, 2 sc, (sc, inc) ×3, 2 sc, (sc, inc) ×2 [22]
Rnd 4: inc, 2 sc, 2 sc, (inc, 2 sc) ×3, 2 sc, (inc, 2 sc) ×2 [28]
FO, leaving a long tail for sewing.
White Belly Pocket
Use white yarn. Worked in rows.
Row 1: 6 sc in MR, ch 2, turn [6]
Row 2: hdc inc ×6, ch 2, turn [12]
Row 3: (dc, dc inc) ×6, ch 2, turn [18]
Row 4: (2 dc, dc inc) ×6, ch 2, turn [24]
FO, leaving a long tail for sewing.
For a calf look, you can use this piece as a decorative belly patch instead of calling it a pocket.
Tail
Use brown yarn for the tail base.
Rnd 1: 8 sc in MR [8]
Rnd 2: inc ×8 [16]
Rnd 3: (7 sc, inc) ×2 [18]
Rnd 4–6: 18 sc [18]
Stuff lightly. FO, leaving a long tail for sewing.
For a more calf-like finish, add a small white or cream yarn tassel to the end of the tail after sewing it to the body.
Calf Horns ×2
Use cream or beige yarn.
Rnd 1: 4 sc in MR [4]
Rnd 2: (sc, inc) ×2 [6]
Rnd 3: 2 sc, dc inc ×2, 2 sc [8]
Rnd 4: (3 sc, inc) ×2 [10]
Rnd 5: 3 sc, dc inc, 2 dc, dc inc, 3 sc [12]
Rnd 6: 12 sc [12]
Rnd 7: 4 sc, dc inc, 2 dc, dc inc, 4 sc [14]
Rnd 8: 14 sc [14]
Rnd 9: 5 sc, dc inc, 2 dc, dc inc, 5 sc [16]
Rnd 10: 16 sc [16]
Rnd 11: (sc, inc) ×8 [24]
Rnd 12: 24 sc [24]
FO, leaving a long tail for sewing. Stuff very lightly if needed.
Outer Ears ×2
Use brown yarn.
Rnd 1: 6 sc in MR [6]
Rnd 2: inc ×6 [12]
Rnd 3: (sc, inc) ×6 [18]
Rnd 4: (sc, inc, sc) ×6 [24]
Rnd 5: (3 sc, inc) ×6 [30]
Rnd 6: (2 sc, inc, 2 sc) ×6 [36]
Rnd 7: (5 sc, inc) ×5, 2 sc
FO, leaving a long tail for sewing.
Inner Ears ×2
Use light pink, beige, cream, or white yarn.
Rnd 1: 6 sc in MR [6]
Rnd 2: inc ×6 [12]
Rnd 3: (sc, inc) ×6 [18]
Rnd 4: (sc, inc, sc) ×6 [24]
Rnd 5: (3 sc, inc) ×6 [30]
Rnd 6: (2 sc, inc, 2 sc) ×5, 2 sc
FO, leaving a long tail for sewing.
Vest / Jacket
Use your vest color. Worked in rows.
Row 1: ch 61
Row 2: starting in 2nd ch from hook: 60 sc, ch 2, turn [60]
Row 3: (9 hdc, hdc inc) ×6 [66]
Row 4: 8 hdc, ch 12, skip 12 sts, 26 hdc, ch 12, skip 12 sts, 8 hdc [66]
Row 5–7: 66 hdc [66]
Row 8: (10 hdc, hdc inc) ×6 [72]
Row 9: 72 hdc [72]
FO and weave in ends.
The vest gives this Brown Calf Crochet Pattern a cozy handmade style. If you like dressed amigurumi characters, you may also enjoy the soft toy styling in the Three Bare Bears Crochet Pattern.
Assembly
Sew the head to the body. Take your time with this step because the head is large and should sit centered on the body. Sew the legs to the lower body if they were not joined already. Make sure both legs sit evenly so the calf can sit nicely. Sew the tail to the back of the body and add a small white or cream tassel at the end for a calf-tail detail. Sew the white belly patch onto the front belly. Sew the white eye pieces to the face between Rounds 17–18. Attach the safety eyes to the white eye pieces if you have not already done so. Sew the soft pink nose in the center of the face. Embroider two small nostrils on the nose using black or dark brown thread. Then embroider a short vertical line under the nose. For a cleaner calf look, you can skip whiskers or replace them with very small cheek stitches. Sew the ears to the upper sides of the head. Sew the horns on top of the head, between the ears. Put the vest on the calf and sew it lightly in place if you want it fixed.
Horn and Ear Placement
Place the ears on the upper left and right sides of the head. Place the horns on top of the head, slightly toward the front and between the ears. Leave about 8–12 stitches between the horns. Before sewing permanently, pin the ears and horns in place and check the calf from the front, side, and top. This small check makes a big difference in the final expression of your Brown Calf Crochet Pattern.
Tips
- The color changes on the body and head create the white calf markings, so take your time with those sections and use stitch markers to keep everything neat.
- If you enjoyed making a Mini Cow Amigurumi Pattern, this brown calf is a lovely next project because it keeps the same cute farm-animal feeling but gives you a bigger, more detailed body shape.
- If you are still practicing small toy construction, a guide for attaching amigurumi limbs evenly can help you sew the legs, arms, ears, and horns more neatly.
- If your decreases leave visible gaps, my guide to the invisible decrease in crochet can help make the calf smoother and cleaner.
FAQ
Is this Brown Calf Crochet Pattern beginner-friendly?
This pattern is best for confident beginners or intermediate beginners. It uses basic stitches, but the shaping, color changes, and assembly require patience.
Can I make this calf without the vest?
Yes. The vest is optional. The calf still looks complete with just the body, face, horns, ears, and tail.
Can I use plush yarn?
Yes, but the finished calf will become much larger. You may need bigger safety eyes and a larger hook.
Can I use embroidered eyes instead of safety eyes?
Yes. Embroidered eyes are a good option if the finished toy is for a young child.
What colors work best for this crochet calf?
Brown, caramel, beige, cream, white, and soft pink work beautifully. You can also use dark brown for a stronger farm-animal look.
Pin This Crochet Pattern!